Blog

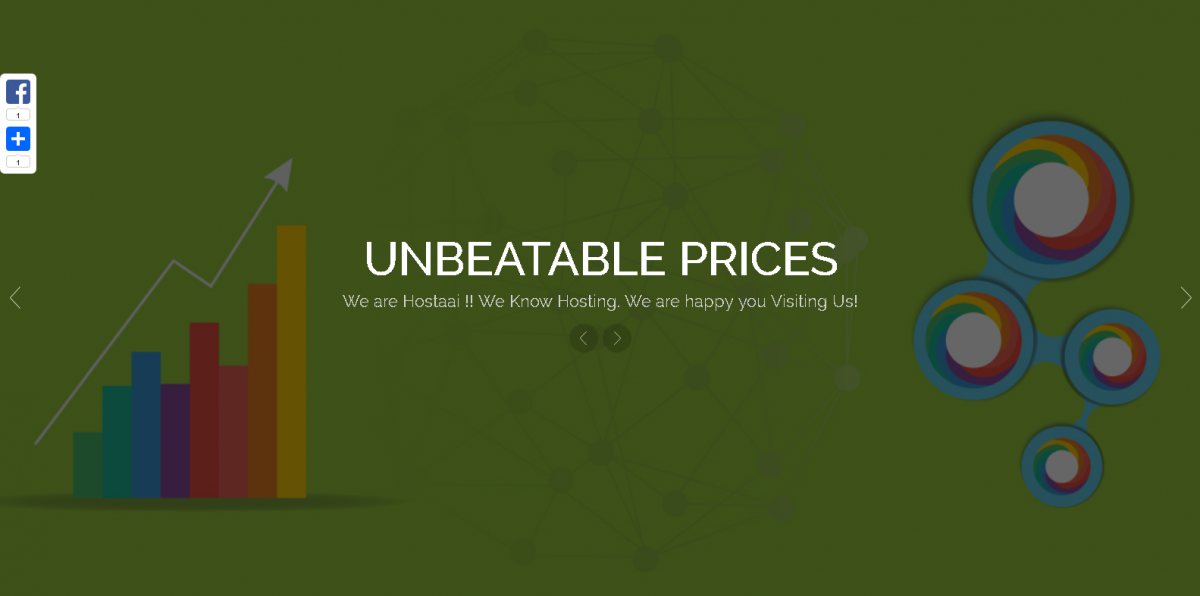
Hostaai.com has Re-Launched Again.

Hostaai homepage

Hostaai.com is a subsidiary of African Art Innovations Ltd. 

We (Hostaai.com) are specialized in  provision of innovative web hosting solutions. Our web hosting portfolio encompasses an enormous variety of web hosting packages, which offer generous hard drive space and monthly bandwidth allowances, domain registration & transfer options. All accounts can be easily administered via our multilingual web hosting Control Panel. A round-the-clock tech support service is offered as well.

It’s Faster, Better and Simple

The large selection of new options in the greatly improved main navigation menu will no doubt help you to discover new hosting horizons! We provide you with all the tools necessary to manage hosting accounts, as well as to track down all your Cpanel behavior. The outlook of all the pages has been reinvigorated so you can enjoy an ultimate browsing experience!Hostaai Support

This project has been developed during the last four weeks.

Some of the major changes:

  • It’s a one page site. This means you navigate our whole website via one single page
  • improved main navigation
  • all sections have been renamed and logically re-arranged
  • new features in the currency settings
  • new option in the Clients Control Panel
  • detailed General Statistics with a better tracking engine
  • the great level of optimization has been noted with the new layout and this means fast load speed
  • 100% responsive both on desktop and mobile.

After the launch of the new site layout, we will continue our work on the development of a better hosting platform based on a top-quality load balancing cluster technology. Furthermore, our services will soon support multi-currency pricing and payments.

For more information about Hostaai, visit the link HOSTAAI

Set Up Your Phone For Email

Basic use

Set up your phone for email

You can set up your phone to send and receive email messages from your email accounts. Remember, you need to set up your phone for internet.

Find “Email”

Press Apps.
Press Email.
Enter email address

Key in your email address.
If an email account has been created already, do the following instead:
Press MORE.
Press Settings.
Press Add account.
Key in your email address.
Enter password

Press Password and key in the password for your email account.
Press NEXT.
If the display tells you that your email account has been set up, follow the instructions on the display to select more settings and finish the setup.
Select server type

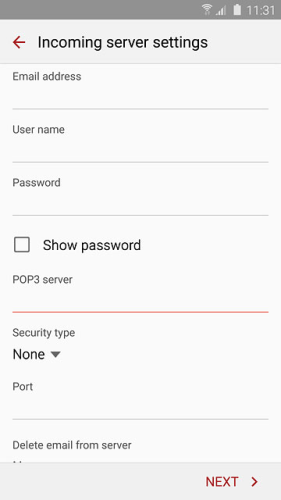
Press POP3 ACCOUNT.
Enter username

Press the field below “User name” and key in the username for your email account.
Enter incoming server

Press the field below “POP3 server” and key in the name of your email provider’s incoming server.
Turn off encryption of incoming email messages

Press the drop down list below “Security type”.
Press None.
Enter incoming port

Press the field below “Port” and key in 110
Turn deletion of email messages on server on or off

Press the drop down list below “Delete email from server”.
Press Never or When deleted from Inbox.
Press NEXT.
Enter outgoing server

Press the field below “SMTP server” and key in mail.yourdomain.com
Turn off encryption of outgoing email messages

Press the drop down list below “Security type”.
Press None.
Enter outgoing port

Press the field below “Port” and key in 26
Turn off SMTP authentication

Press Require sign-in until the display tells you that the function is turned off.
Press NEXT.
Select settings for retrieval of new email messages

Press the drop down list below “Sync schedule”.
Press Manual or the required period.
Turn email message notification on or off

Press Notify me when email arrives to turn the function on or off.
Press NEXT.
Enter email account name

Key in a name for your email account.
Enter sender name

Press the field below “Your name (for outgoing emails)” and key in the required sender name.
Finish setup

Press DONE.
Wait while your phone retrieves new email messages.
Return to the home screen

Press the Home key to return to the home screen.

African Art Innovations Ltd Donates

GCA - AAI donation

On Sunday 20th March 2016, African Art Innovations Ltd donated a banner and offered to provide FREE website maintenance and hosting services to Gain Confidence Africa.

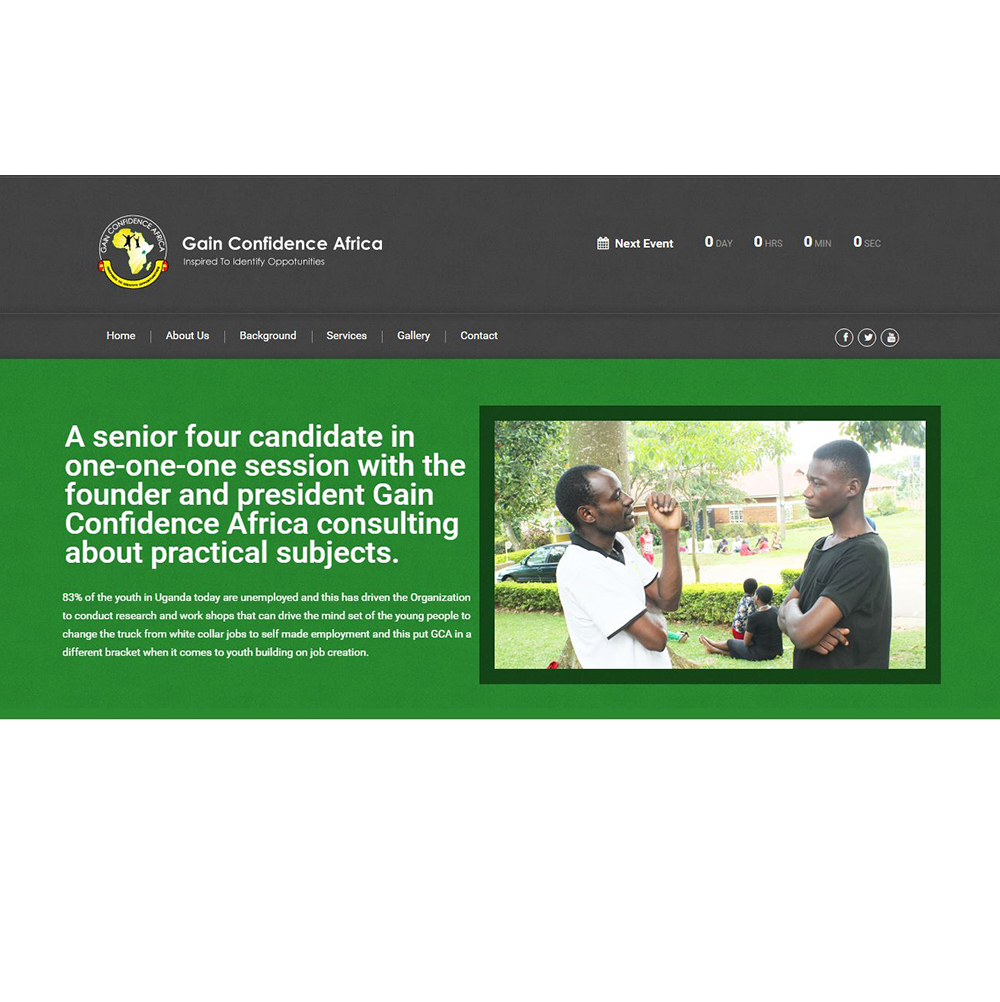
Gain Confidence Africa is an independent non- governmental, non-partisan and not for profit making but an organization driven by the desire to create confidence among the African children and the youth at large. This is aimed at enabling young people exploit the environment around them to attain what they lack other than concentrating on what they lack as a hindrance to their destination.

Gain Confidence Africa whose mission is to build a self-confident destined generation of youth who will face tomorrow’s challenges as opportunities through creation of a platform, where young people and their communities can share skills, participate in promoting human right awareness while exploring innate abilities towards lasting development built on a foundation of equity has the following objectives.

  • To develop skilled, self-sustaining, goal oriented, young people in and outside school with appropriate life skills that will foster financial discipline through development of a saving culture among children and youth for entrepreneur sustainability.
  • To promote social relationship and networking among young people through team work, mobilization of children, youth communities, institutions and policy makers to create a safe and supportive environment for growth and development of the youth.
  • To promote a reading culture among young people in school for quick approach to the general issues as well as encouraging young people to develop a sense of critical thinking about  violence, its causes, consequences and alternatives to bring justice and peace in their communities as future leaders of such areas.
  • To promote the general welfare of the children and the youth through addressing dangers of drug abuse and betting to those in and outside especially schools.
  • To search and develop talent among young people right from childhood in preparation for the future through self-expression, positive thinking upon their life as well as living a purpose driven life to realize their full potential as well as capacity.
  • To promote and develop patriotism among African children to treasure and love their country.

WHAT THEY DO

  • Mentorship and personal development
  • Reading together sessions
  • Talent development
  • Critical thinking development
  • Training on small income generating projects
  • Skill training on saving and financial management
  • Connection of different privileged groups
  • Career guidance
  • A look at Africa’s past achievements in science, mathematics among others
  • Training on patriotism for Africa that starts with where we are
  • Leadership training
  • Inspirational programs

As African Art Innovations Ltd, we set out to break new ground in the industry by creating systems and services looking at changing life, while simultaneously providing incomparable customer service in the field of art and technology so a need to put hand on the services provided by GCA geared to youth empowerment.

We therefore encourage anyother interested parties, youths and organisations who look at this noble cause as an opportunity to empower youths in there communities, schools etc to come on board.

Directors GCA - AAI Donation 2 GCA - AAI Donation 3

4 Ways to Prevent Image Theft in WordPress

Table Of Contents

4 Ways to Prevent Image Theft in WordPress

Image theft is a common problem that photographers deal with on a regular basis. Recently one of our readers asked if there was a way to prevent image theft in WordPress. In this article, we will share 4 ways to prevent image theft in WordPress powered websites.

Prevent Image Theft

About Image Theft and Copyright

Copyright laws are universal and applicable around the world. The original creator automatically becomes the copyright owner of their creative work. Even if they don’t mention it on their website, one should still assume that the content they are viewing is protected by copyright.

This includes images, text, videos, or any other form of content that you see on the web.

The problem is that images and text can be easily copied. Many people think that no one would notice if they stole an image and used it on their own website.

It is not only illegal but also unethical to steal other people’s work. There are many places where you can easily find royalty free and public domain images.

While it is flattering to see other people use your work in their own projects, sometimes it can be very frustrating to see a blatant disregard for your rights.

There is no way to completely stop people from stealing your images, but there are plenty of ways to discourage and prevent image theft on a WordPress website.

Here are the 4 most common ways to protect your images in WordPress.

1. Disable Right Click

Stealing images from your website is easy because a user can simply right click and select ‘save image as’ to download them. You can disable right click on your website and make it more difficult for an average user to steal your image.

Here are two plugins that you can use to disable right click on images in WordPress.

Envira Gallery

Envira Gallery is the best WordPress gallery plugin in the market. Apart from helping you create beautiful image galleries, Envira comes with tons of other features as well. One of these features is image protection.

Simply go to Envira Gallery » Settings and click on the Addons tab. Scroll down to locate Protection Addon, and then install and activate it.

Image theft protection addon in Envira Gallery plugin for WordPress

Now create a new image gallery with Envira Gallery. If this is your first time, then take a look at how to easily create responsive image galleries in WordPress with Envira Gallery.

When creating your gallery, click on the Misc tab and scroll down to the bottom. You will find the option to enable image protection. Check this option and save your gallery.

Enabling image protection for a gallery with Envira Gallery

You can now add this image gallery anywhere on your WordPress site. It will automatically disable right click on images.

WP Content Copy Protection

This simple plugin is free and will disable right click on your WordPress site. The downside of using this plugin is that it disables right clicking on the whole page.

If you are using a slider or lightbox plugin, then sometimes this plugin will not work properly.

2. Use Watermark on Your WordPress Images

Watermarks seem to be working great for many stock photography websites. The obvious down side is that your photographs or images might not look the best.

However, you can add watermark tastefully. The goal is to keep the aesthetic appeal of your images while still discouraging people from stealing them.

Method 1: Using Envira Gallery

Again, we can’t stress enough that Envira is photographer’s best friend. It also comes with a Watermarking addon. You will need at least a silver license of Envira Gallery to use this addon.

Simply install and activate Envira Gallery plugin. Upon activation, you need to visit Envira Gallery » Settings and click on the addons tab. Locate Watermarking addon, and then install and activate it.

Now when creating a gallery or editing an existing gallery, you will notice the new watermarking tab in gallery settings.

Watermarking addon in Envira Gallery plugin for WordPress

Method 2: Using Easy Watermark Plugin

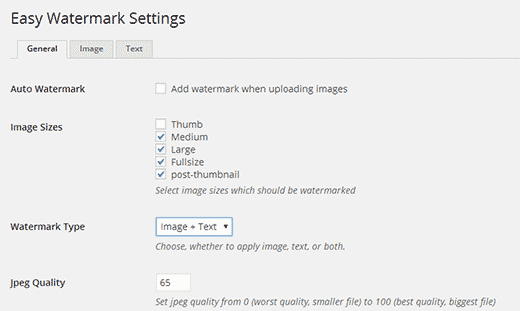
The other option is to use the Easy Watermark plugin. Simply install and activate the Easy Watermark plugin. Upon activation, go to Settings » Easy Watermark page to configure the plugin settings.

Settings page for Easy Watermark plugin

For detailed instructions take a look at our guide on how to automatically add watermark to images in WordPress.

3. Disable Hotlinking of Images in WordPress

Another common way to steal images from websites is by loading them from the original source. The image will load from your servers and will be displayed on third party websites without your permission.

This also increases your server load and bandwidth usage.

Here is how you can disable hotlinking of images from your WordPress site.

Simply add this code to the .htaccess file in your WordPress site’s root directory.

1 #disable hotlinking of images with forbidden or custom image option
2 RewriteEngine on
3 RewriteCond %{HTTP_REFERER} !^$
4 RewriteCond %{HTTP_REFERER} !^http(s)?://(www\.)?wpbeginner.com [NC]
5 RewriteCond %{HTTP_REFERER} !^http(s)?://(www\.)?google.com [NC]
6 RewriteRule \.(jpg|jpeg|png|gif)$ – [NC,F,L]

Don’t forget to replace wpbeginner.com with your own domain name.

This code blocks hotlinking while still allowing images to be viewed in search results and on your website.

Can’t find the .htaccess file? Refer to our tutorial on how to find the .htaccess file in WordPress.

4. Add Copyright Notices on Your WordPress Site

Adding a copyright notice to your website can also discourage people from stealing images. You can simply add a copyright notice to your theme’s footer file in plain text or HTML like this:

1 <p>&copy; 2009-2016 WPbeginenr.com</p>

The downside of this is that you will have to edit this code each year. A better approach is to add a dynamic copyright notice in WordPress. Simply add this code to your theme’s functions.php file or a site-specific plugin.

01 function wpb_copyright() {
02 global $wpdb;
03 $copyright_dates = $wpdb->get_results("
04 SELECT
05 YEAR(min(post_date_gmt)) AS firstdate,
06 YEAR(max(post_date_gmt)) AS lastdate
07 FROM
08 $wpdb->posts
09 WHERE
10 post_status = 'publish'
11 ");
12 $output = '';
13 if($copyright_dates) {
14 $copyright = "&copy; " . $copyright_dates[0]->firstdate;
15 if($copyright_dates[0]->firstdate != $copyright_dates[0]->lastdate) {
16 $copyright .= '-' . $copyright_dates[0]->lastdate;
17 }
18 $output = $copyright;
19 }
20 return $output;
21 }
22
23 add_shortcode('copyright','wpb_copyright');
24 add_filter('widget_text', 'do_shortcode');

This code finds the date of the first post you published on your blog and the last date you published anything. After that it outputs a dynamic copyright notice.

You will need to add the shortcode [copyright] to any post, page or text widget on your site to display copyright notice. You can also use this code in your theme’s footer.

1 <?php echo wpb_copyright(); ?>

Source Wp Beginner

How to make a website

Table Of Contents

3 Quick Steps in This Guide

You’ll learn how to…

How to make a website

Step 1

Choose a website building platform

Step 2

Choose your website address (www.)

Step 3

Set up & customize your website


Step one

CHOOSE THE BEST WEBSITE BUILDING PLATFORM

Before you start worrying about colour schemes and domain names, you’ve got to decide what platform you’re going to build your website with.


What do I mean by “platform”?

Well, back in 2004 when I got started with web development, most sites were built using HTML (code), CSS and even Flash. These took a lot of time to learn and were tricky to master.

That’s why most people still think creating a website from scratch is difficult or requires a lot of coding and design skills – but that’s no longer true!

In 2016, content management systems (CMS) like WordPress have made creating a website accessible to everyone.

To put simply, a content management system (or website building platform) is a user-friendly platform for building websites and managing your own online content, instead of using a bunch of loose HTML pages.


Three most popular site building platforms in 2016

Image and data credit: OpenSourceCMS.com

As you can see, nearly half of the websites on the internet are running on the WordPress website platform. Just look at those statistics made by W3 Techs and BuiltWith.


Why WordPress is better than the rest?

Because it’s AWESOME! But more importantly…

  • It’s totally FREE, with loads of layouts to choose from

WordPress doesn’t cost a dime to download or install, and there’s a huge community who have designed beautiful themes and templates, making it easy to get going fast.

  • It’s extremely beginner-friendly

If you know how to use Microsoft Word, you already know how add your own content. WordPress can be expanded with free plugins to handle just about any site you can imagine – from gorgeous business pages to social networking sites. With “plugins” you’ll be able to add contact forms, subscription forms, image galleries and so on for your website – pretty simple, huh?

  • Small or Big site? Doesn’t matter…

From basic blogs to beautiful business sites and online stores, WordPress can handle just about any kind of website. WordPress is used by Facebook, eBay, McAfee, Mozilla, Reuters, CNN, Google Ventures and even NASA.

  • It’s mobile & tablet friendly

The website you build will be responsive, looking great on every mobile device, smartphone and tablet.

  • There’s a huge support community

With so many people on the platform, it’s easy to find help when you need it, and lots of free resources you can dig into.

In fact, the site you’re reading right now is built with WordPress! It’s popular for a reason. Specifically, 25% of all websites are built with WordPress. If you’re interested in the details, here are more facts about WordPress.


Of course, there are other CMS / website building platforms, too.

Drupal is a very powerful platform that is popular with web developers and experienced coders, but it comes with a very steep learning curve that makes it a bad choice for beginners.

Joomla is similar to WordPress and works great for online stores, but you’ll need at least a little bit of technical coding to make it work the way you want.

If you want more details, I’ve put together a pretty comprehensive comparison between WordPress, Joomla and Drupal.

If for some reason you don’t want to build your site with WordPress, check out my Drupal, Joomla and HTML5 guides as well. They are all FREE to use.


But for beginners, I strongly suggest sticking to WordPress.

It’s the easiest platform I’ve ever worked with, but it’s flexible enough to suit everyone from small business owners, and freelancers to creative artists and bloggers.

In Step 2, I’ll walk you through the process of choosing a domain name and finding a space to host your site.

In Step 3, I’ll show you everything you need to know to install and customize a WordPress website. Don’t worry – I’ll walk you through the process, with lots of images as a reference.

Remember; I’m here to help!

I like to see the finished websites people build, and when I answer questions, I usually get to see the results. So if you get stuck during set up process, just use our contact form.


THINGS TO DO BEFORE NEXT STEP:

checklistChoose a platform to build your website. I’m recommending WordPress which is free to use and easy to understand. In this guide, I’ll be showing you how to create a site using WordPress, too.

checklistAt this point you don’t need to install/download anything. I’ll show you this in the next steps.


Step two

CHOOSE A DOMAIN NAME & WEB HOSTING FOR YOUR WEBSITE

To get a new website online, you’re going to need two things:

  • A domain name (a web address like yoursitename.com)
  • Hosting (a service that connects your site to the internet)

The WordPress platform itself is free, but a domain name and hosting will cost you around $3 – $5 a month (less than a coffee, so it won’t break the bank).

Owning your own domain name looks far more professional than having your site on someone else’s domain (like yourbusiness.freewebsite.com), and it’s super affordable, too.

Plus, having your own hosting will also make sure your website loads quickly and won’t go down for hours at a time (pretty important for everyone who visits your pages.)


Where do I get a domain name and hosting?

I’ve mostly used Hostaai.com as a web hosting and domain registrar.

They’re really affordable, have good customer service, and they’re currently throwing in a domain name for free – so it’s worth checking them out.

When you get a domain name, you’ll also get a personal email account(s): [email protected] – way more professional than a generic Gmail or Yahoo address.

Already have a domain name and hosting? Go ahead and skip ahead to step 3, where I’ll explain how you can set up your website.


What kind of domain name should I pick?

As an easy starting point:

  • If you’re making a website for your business, your domain name should match your company name. For example: YourCompanyName.com
  • If you’re planning to set up a website for yourself, then YourName.com can be a great option.

Domain names usually end with .com, .org or .net, but in recent months, a huge amount of domain extensions (the end part of the web address, like .com) have come out, ranging from .agency to .pizza.

My best advice? Avoid the weird extensions and go with .com, .net or .org unless they perfectly describe what you have to offer – and even then, see if you can find a more common name.

While .com, .org and .net are commonly used and easily remembered, the domain extension craze hasn’t really gone mainstream yet – so people may not find you if you use a really different domain extension.


How should I choose my domain name?

A) Is it brandable? For example, if you make a site about poetry then best-poetry-website.net is not a good choice: poetryacademy.com or poetryfall.com is much better.

B) Is it memorable? Short, punchy and clear domain names are much easier to remember.If your domain name is too fuzzy, too long or spelled in a strange way, visitors may forget it.

C) Is it catchy? You want a name that rolls off the tongue, describes what you do and sticks head. Coming up with a cool name can be a bit tough since there are approximately 150 million active domain names in the world right now – but don’t give up.

There’s one rule that always applies to domain names: If you like it, go for it.


THINGS TO DO BEFORE NEXT STEP:

checklistDo some brainstorming to come up with a unique domain name that reflects your business, site or blog.

checklistGo ahead and secure yourself a domain name and web hosting through Hostaai.com (pretty simple process, but in case you get stuck, I’ve more in-depth explanation here)

Step three

Set up your WordPress Website

Once you’ve bought your domain name and set up your hosting, you’re well on your way!

Now it’s time to get your website up and running. The first thing you’ll need to do is install WordPress to your domain.

Installing WordPress

There are two possible ways to install WordPress, one MUCH easier than the other.

1. One-Click-installation for Websites like WordPress, Drupal, Joomla

Almost every reliable and well-established hosting company has integrated 1-click-installation for WordPress, which makes getting going a snap.

If you signed up with Hostaai.com or any other similar hosting company, you should find your “1-click-installation” in your account control panel.

Here are the steps you should follow (should be similar/same on all the major web hosting companies):

  • 1. Log in to your hosting account.
  • 2. Go to your control panel.
  • 3. Look for the “WordPress” icon.
  • 4. Choose the domain where you want to install your website.
  • 5. Click the “Install Now” button and you should get access to your NEW WordPress website.

Need a little more help installing WordPress? See this in-depth guide.

2. Manual install (if needed)

If for some odd reason (some hosting companies don’t have one-click-install for WordPress) you don’t have the possibility to install WordPress automatically, look this manual guide below:

Installing WordPress ManuallyPssst – if they don’t have 1-click-installation, maybe you’re dealing with a bad host!


Choosing a Theme/Template for your site

Once you have successfully installed WordPress to your domain, you’ll see a very basic yet clean site:

default_wordpress_theme

But you don’t want to look like everyone else, do you? That’s why you need a theme – a design template that tells WordPress how your website should look.

Here’s where it gets fun: There are thousands of awesome, professionally designed themes you can choose from and customize for a site that’s all your own.

Here’s how to find a theme you like:

1) Log into your WordPress dashboard

If you’re not sure how, type in: http://yoursite.com/wp-admin (replace “yoursite” with your domain).

This is what the WordPress dashboard looks like:

wordpress_default_dashboard

Everything is easily labelled. If you’re feeling a bit overwhelmed, don’t sweat it – I’m going to show you where to go next.

2) Access FREE themes

Once you’re in the dashboard, you’ve got access to over 1500 free themes! Just look along the side bar for “Appearance”, then click “Themes”.

If you want something more professional or elegant than what you find here, you can head over to ThemeForest.net where there’s a HUGE library of themes to pick from at varying costs.

But before you do that, I really suggest you at least try spending some time browsing the free themes. Many of them are actually really professional and well made; so don’t write them off.

free_wordpress_blog_themes

As you can see above, installing a new theme for your website is very easy.

You can search for specific keywords and/or use filters to find themes that suit your style. Finding the perfect theme can take a while, but it’s worth it.

You should also look for themes that are “responsive”, as this means they will look good on any mobile device.

Just punch it in as one of your keywords, and you’ll be all set!

3. Install your new theme

Once you have found a theme you like, installing it is as simple as clicking “Install” followed by “Activate”.

install_theme

IMPORTANT: Changing themes won’t delete your previous posts, pages and content. You can change themes as often as you want without having to worry about lose what you’ve created.

How do I add content and create new pages?

With your theme installed, you’re ready to start creating content. Let’s quickly run through some of the basics:

Adding and editing pages

Create a new page

Want a “Services” page, or an “About Me” page (like I have on my menu at the top of the site?)

1. Look along the sidebar in the WordPress Dashboard for “Pages” -> “Add New”.

2. Once you’ve clicked, you’ll find a screen that looks a lot like what you’ve maybe seen in Microsoft Word. Add text, images and more to build the page you want, then save it when you’re done.

Adding pages to the menu

If you want your new page to be linked to in your navigation bar,

1. Save any changes you’ve made to the page by clicking “Update”

2. Click “Appearance” -> “Menus” in the sidebar of the WordPress Dashboard

3. Find the page you created and add it to the list by clicking the checkbox next to it and then “Add to Menu”.

wordpress_navigation_bar_website

Adding and editing posts

If you have a blog on your website, “Posts” will be where you turn to next. You can use different categories to group similar posts.

If you want to add a blog to your website, you can use different categories and posts. Let’s say you want to create a category named “blog”. To do so, simply add it to your menu and start making posts.

Here’s what you need to do:

a. Create a new category by going to “Posts -> Categories”

OR

b. Create a blog post by going to “Posts -> Add New”. Once you’ve finished writing your blog post blog post is ready, you need to add the right category for it.

Once you’ve created your category, simply add it to the menu, and you’re in business!

Customizations & Tweaks (Widgets, comments & just some “stuff” you need to know)

In this section I’ll cover some of the basics things I’m asked about all the time that will help you to tweak your website.

Changing Your Title and Tagline

Page titles explain to searchers what your website is about, and they’re also a big part of how search engines determine your rankings, so you want to be sure they’ve got the keywords you want to target in them (but in a natural way, written for real people).

You should use a unique title on every page of your site. For example, my site’s title is “How to Make a Website”.

(Can’t find it? Just hold your mouse over the tab at the top of your web browser).

Taglines are added at the end of titles across every page. My site’s tagline is “Step by Step Guide”

In order to change the title and tagline on your website, go to “Settings -> General” and fill in the form below:

site-title-and-tagline

Disabling Comments for Posts & Pages

Some websites (business/organisation sites mostly) don’t want their visitors to be able to comment on their pages.

Here’s how to shut comments off on WordPress pages:

1. While you are writing a new page, click “Screen Options” in the top right corner.

2. Click the “Discussion” box. The “Allow Comments” box will appear at the bottom.

3. Untick “Allow Comments”.

Want to disable comments on every new page by default?

1. Go to “Settings -> Discussion” and untick “Allow people to post comments on new articles”

site_discussion-settings

Setting Up a Static Front Page

Some people contact me saying they’re frustrated that their home page looks like a blog post. You can fix that by making your home page “static”.

A static page is a page that doesn’t change. Unlike a blog, where the first new article will show up at the top every time, a “static” page will show the same content every time someone comes to the site – like a home page you’ve designed.

To set up a static front page:

1. Go to “Settings -> Reading”

2. Choose a static page that you have created. “Front Page” denotes your home page, “Posts page” is the front page of your blog (if your entire site isn’t a blog).

If you don’t choose a static page on your own, WordPress will take your latest posts and start showing them on your homepage.

static_homepage

Editing sidebar

Most WordPress themes have a sidebar on the right side (in some cases it’s on the left).

If you want to get rid of the sidebar or edit out items you do not need like “Categories”, “Meta” and “Archives”, which are usually pointless, here’s how:

1. Go to “Appearance -> Widgets” in the WordPress Dashboard.

2. From here, you can use drag n’ drop to add different “boxes” to your sidebar, or remove the items you don’t want.

There’s also a “HTML box” – a text box where you can use HTML code. For beginners, don’t worry about this bit – just drag and drop the elements you’d like in your sidebar.

Installing Plugins to Get More out of WordPress

What is a plugin?

“Plugins” are extensions that are built to expand WordPress’ capabilities, adding features and functions to your site that don’t come built-in.

They’re shortcuts to getting your site to do what you want to, without having to build the feature from scratch.

You can use plugins to do everything from adding photo galleries and submission forms to optimizing your website and creating an online store.

How do I Install a new Plugin?

To start installing plugins, go to “Plugins -> Add New” and simply start searching.

Keep in mind that there are over 25,000 different FREE plugins, so you’ve got a LOT to choose from!

Installation is easy – once you find a plugin you like, just click “Install”.

BUT – before you go and install every single one, I suggest you to read this article: Things you need to know about using WP plugins.

To save you some time, I’ve put together a list of the most popular and useful plugins that webmasters find useful:

Contact form 7: My website has a contact form on my About Me page. It’s an awesome feature to have, as people (like you!) can fill in the form and send me an email without logging into their own email provider. If you want to do something similar, definitely get this plugin. P.S: Here’s a step-by-step guide for setting it up.

Yoast SEO for WordPress: If you want to make your WordPress site even more SEO-friendly, this plugin is a must-have. It’s free, and it’s awesome. You’ll be able to edit your title tags, meta descriptions and more, all from within the page itself – no more fussing with WordPress settings.

Forum: Interested in starting a forum on your site? Look for the plugin named “bbPress” and follow their tutorials.

Of course, this is just the tip of the iceberg! Here’s a list of the top 100 plugins for WordPress by Tom Ewer, someone who knows plugins, really well!

… and that is basically it.

Congratulations – you’re ready to launch!

If you’ve followed the steps in this guide, you should now have a fully-functional WordPress website! That wasn’t so bad, was it?

We hope you found this guide really useful –but if you have any more questions or need help with one of the steps we highlighted, I’m happy to share some guidance. For this, use our contact/support page.

Last, but not least..

If you find my guides useful, please share my page below. This keeps me motivated to keep all the information on this site up-to-date.

Cheers,

Credit :Website Setup

Hostaai.com

Table Of Contents

Hostaai

About Us

At Hostaai.com, we are specialized in providing first-class, customer-centered shared hosting services. Our goal is to render the hosting service as easy to use as possible.

Website Hosting Services

Our portfolio is composed of an immense variety of web hosting packages, which offer generous web storage space and traffic quotas, domain name registration/transfer options, easy-to-work-with Domain and Email Managers, multiple domain name hosting options, as well as free-of-cost bonuses, such as a single-click apps installer and a web site building tool. All web hosting accounts can be easily administered through our multi-language hosting Control Panel. A 24x7x365 client support service is offered too.

Hosting Platform

One thing that sets us apart from other hosting service providers is the circumstance that we employ a different hosting platform and hosting Control Panel. The main contrast between our web hosting Control Panel and the popular cPanel is that our Control Panel offers billing, domain and web site management options, which spares you the effort of remembering different usernames and passwords for several hosting Control Panels.

Website Link : www.hostaai.com

Gain Confidence Africa

Gain Confidence Africa

Gain Confidence Africa is an independent non- governmental, non-partisan and not for profit making but an organization driven by the desire to create confidence among the African children and the youth at large. This is aimed at enabling young people exploit the environment around them to attain what they lack other than concentrating on what they lack as a hindrance to their destination.

OBJECTIVES

  • To develop skilled, self-sustaining, goal oriented, young people in and outside school with appropriate life skills that will foster financial discipline through development of a saving culture among children and youth for entrepreneur sustainability.
  • To promote social relationship and networking among young people through team work, mobilization of children, youth communities, institutions and policy makers to create a safe and supportive environment for growth and development of the youth.
  • To promote a reading culture among young people in school for quick approach to the general issues as well as encouraging young people to develop a sense of critical thinking about  violence, its causes, consequences and alternatives to bring justice and peace in their communities as future leaders of such areas.
  • To promote the general welfare of the children and the youth through addressing dangers of drug abuse and betting to those in and outside especially schools.
  • To search and develop talent among young people right from childhood in preparation for the future through self-expression, positive thinking upon their life as well as living a purpose driven life to realize their full potential as well as capacity.
  • To promote and develop patriotism among African children to treasure and love their country.

Website Link : www.gainconfidenceafrica.org